Prerequisites
Before you begin you should check that you have the items listed below:
- A USB keyboard and mouse
- An SD card with a capacity greater than 4GB (8gb more recommended)
- HDMI COMPOSITE or with a monitor cable
- Micro-USB charger capable of delivering 5V - 1A
- An Ethernet cable - RJ45 network connection (if needed)
Preparing the System SD card
Download the system image on the official website : http://www.raspberrypi.org/downloads
I suggest you install the Raspbian system, which is an optimized distribution of Debian.
On Windows, you can use the tool Win32DiskImager.
Insert your SD card into your PC then Win32DiskImager, select the image Raspbian system.
Select the drive letter of the SD card, then start the operation by clicking "write".
That is, your SD card is ready to be inserted into the slot of the Raspberry Pi
first start
The Raspberry Pi has no button ignition / extinction.
It is automatically turned on when you connect the Micro USB and power off when unplugged.
Verify that all devices are properly connected, then run you.
Configuration screen
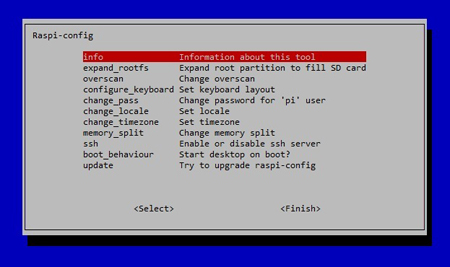
When first starting the Raspberry Pi, you will find the setup screen.
Later, following need, you can find it by typing in "Raspi-config" terminal.
Here are some configuration tips:
- Think "Expand" root partition as this will allow you to have all of the available space on your SD.
- Well set correctly on your keyboard (usually in EN)
- The same applies to "local" and "timezones"
- You can choose the memory allocated with the menu "memory_split"
- If you want to start automatically on the Raspberry Pi XFCE desktop, click the "boot_behaviour" option
- Do not forget to restart your Raspberry ("sudo reboot")
I suggest you also enable SSH for the future.
Upgrading the system
Before started, it is important to have an updated system.
So make an update and upgrade :
sudo apt-get update |
Then :
sudo apt-get upgrade |
Your system is now updated.
Configure your local network
If your Raspberry Pi is connected to a local network, you will probably need to configure correctly the ip of it.
By default, your system is configured with an automatic IP assigned by DHCP.
If you want a slightly more advanced configuration, you can edit the file : /etc/network/interfaces
sudo nano /etc/network/interfaces |
Here is an example below of a static IP configuration :
| iface eth0 inet static address 192.168.1.25 netmask 255.255.255.0 gateway 192.168.1.1 |
sudo /etc/init.d/networking restart |
Now you're ready !


